To issue items to a borrower:
- Scan the borrower barcode or search for borrower, select and load details.
- Either:
- Scan or type the item’s accession number in the Barcode box. Repeat this step for each item to be issued, or,
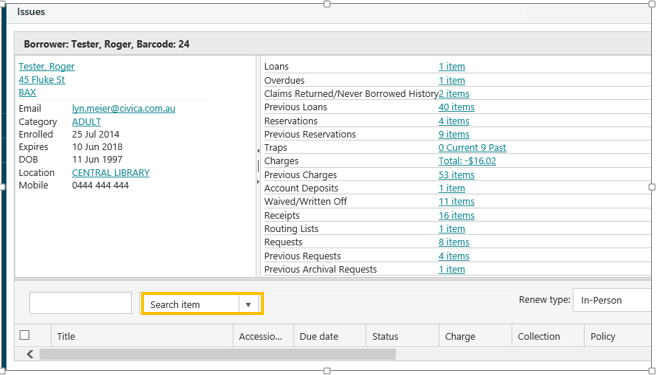
- Click on Search item to the right of the Barcode input box.
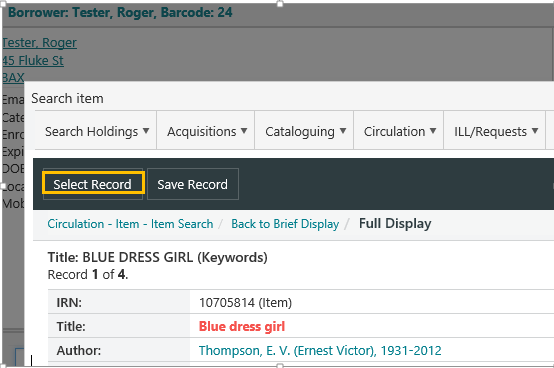
This will pop up an item search form window and allows items without accession numbers to be issued. Locate the item and click Select Record
You can select records across pages. At the bottom of the browser you'll see the number of records selected. You can click Clear to deselect all the records.
Issuing reserved items
If there are allocated items awaiting collection by the borrower then an alert will be displayed when you enter the borrower’s number.
Click OK to continue.
Issuing allocated reservations to another borrower
You can issue an item that has been reserved and allocated to one borrower to another borrower, and specify that this issue satisfies the reservation.
If you select the Complete reservation checkbox and click Proceed then this will complete the allocated reservation and clear it from the record of the borrower who originally placed the reservation.
If you clear the Complete reservation checkbox and click Proceed then this will deallocate the reservation — i.e. the borrower will go back into the reservation queue. Any allocation charge will be automatically removed.
Completing a reservation
A reservation is completed when any item for the reserved titled is issued – even if it is not the allocated item. For example:
The first item has been allocated to a borrower.
When the second item is returned and issued to the borrower this alert will display.
Click Proceed to deallocate the [top] allocated item and fulfil the reservation with the 2nd item.
Reduction in loan period
When the issuing of an item causes a reduction in the loan period (i.e., because there are other outstanding reservations) then an alert is displayed to show that the due date has changed. The Reduction rate for loan period is specified in the loan policy.
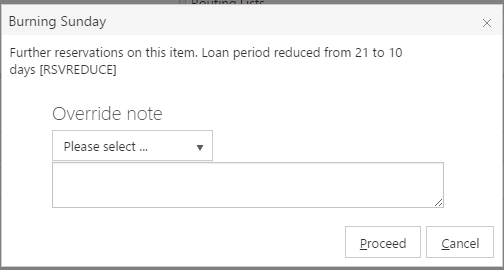
Setting an overriding loan period
Staff can set an overriding loan period when issuing items to a borrower.
To do this:
- Select the borrower.
- On the Other menu, click Local Settings.
- To specify an overriding loan period for day loans, enter a number of days in Day loan period or specify a due date in Date due back.
- To specify an overriding loan period for minute loans, enter a number of minutes in Minute loan period or specify a due time in Time due back.
- If you have a high enough privilege level you can select Set indefinite loan period to specify an indefinite loan.
- You can add an override reason for issues/renewals when the due date is overridden in the local settings. If you specify a reason when an item is issued then this will be recorded against the loan record. The override reasons are set up in the lookup table LPVRN, and can be maintained using the Table Manager.
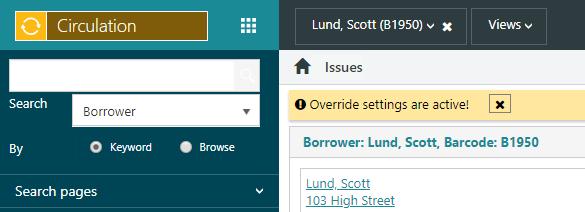
- Click Save to save your changes. You will see "Override settings are active!" at the top of the Issues or Returns View.
- Scan or type the item's accession number in the Barcode box.
You can click the "X" to reset the override settings to the default values. The override settings are also cleared when you select another borrower (if Clear OLP per borrower is selected) and when you change transaction type, e.g. from issues to return.
Displaying details of the loan policy
To display details of the loan policy for an issued item:
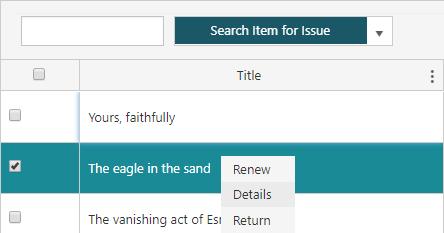
- Double-click on a row in the issues grid (or right-click and then click Details). This displays details of the loan.
- Click the Loan policy link.
Displaying details of the last borrower of an item
To display details of the last borrower of an item:
- Double-click on a row in the issues grid (or right-click and then click Details). This displays details of the loan.
- Click the Item link to display details of the item.
- Click the Last borrower link.
Supervisor override
If an alert is displayed when you try to issue or renew an item, you will only be able to proceed if you have a high enough privilege level.
In the example below the privilege level of the alerts is High and Medium, and this is higher than the staff member's privilege level.

However, you can click the Supervisor button to be prompted for a username and password. A staff member with a higher privilege level can then temporarily log on in order to override the restriction.
The Supervisor button does not apply to borrower validation alerts, i.e. the ones that are displayed when you enter the borrower’s number — you can always override these alerts to display the borrower’s details. It only applies to the alerts that are displayed when you are trying to carry out a transaction for the borrower, for example, if you are trying to issue an item.
Here is a list of the borrower alerts:
- AGELIMIT
- BRWDLQGEN (if no specific alert is set for a borrower trap)
- BRWSTATUS
- OVDWARN
- TOTCHRG
- TOTCREDITS
- TOTFINES
- Other site-specific borrower traps
Reset button
Once you have finished issuing items to one borrower click the ‘X’ next to the borrower's name. This signals to the Circulation module that you are finished with this borrower and that the issue slip should now be printed. It also clears the screen.
If you have finished issuing items to the borrower and now wish to print the issue slip before continuing with further transactions for this same borrower, you can click Finish slip.
Scanning in the next borrower number acts like Reset — it signals to the Circulation module that you are finished with the previous borrower, and that the issue slip for that borrower should now be printed.
